Updated October 19, 2025 - I am even more deep into local AI at this point. This guide has been updated with some additional dependencies.
Over the past few months, I have become interested in running small language models on underpowered computers. I'm mainly referring to using SLMs (small language models) on computers with no dedicated Nvidia GPU.
This is purely my opinion but I think accessibility to AI in using language models is becoming more important. This accessibility must be taken into consideration if we expect users to embrace running models locally.
There are a few challenges that make this realistic, and possible. It has been difficult for the average consumer to acquire GPUs to run LLMs locally in a way that satisfies the same use cases as if they are interacting with a cloud-based LLM such as ChatGPT (OpenAI), or Claude (Anthropic). On top of that, in order to have a good and frustration-free experience, a user can't be using any GPU with expectation that it will work with local language models. The hardware that is necessary must almost always be Nvidia. Nvidia GPUs can be very expensive, but also leaves out those with AMD and Intel GPUs with expectations to jump through hoops to get working. I know, ROCm, Vulkan, etc are things, but the support, performance and ease in configuring can be deterring.
I think a lot of cloud providers are already aware of this. I suspect that this is a really good opportunity to bring users into their ecosystem as they have made smaller versions available for use as a part of free tiers in the services they offer (ChatGPT 4o-mini and Claude Haiku).
Nevertheless, not every use case is appropriate for a cloud-based language model. For myself, there's an urge to explore and see what else is out there for us, and how we can leverage them as consumers without having access to the fanciest hardware.
So let's give a chance for the local, small language model!
What's a "Small Language Model"?
I think a good resource to understand what is considered to be a small language model is from Microsoft Learn. Check this out: Concepts - Small and large language models - Azure Kubernetes Service | Microsoft Learn. Reading the article, we can see that any model with less than 10 billion parameters is considered to be "small".
Not considering the requirement for an NPU, I think Microsoft's recommended memory and storage for a Copilot+ PC is pretty reflective on what we should expecting for big names to have us run local AI in the future.
The key points are:
- 16 GB DDR5 RAM
- 256 GB SSD
NPU support for LLMs aren't quite there yet (if at all exists) -- so we can ignore that.
We can definitely fit a model in just 16GB of RAM. There are plenty! For example Google recently released Gemma 3, which comes in 2 small flavors: 1 B and 4 B parameters. The 4 B is particularly interesting because it is multi-modal and can perform vision-based tasks.
Okay, so we can run these smaller models, but are they actually any useful? Let's find out.
The Target System
My laptop, of course! 🤣
A good system to target in running local small LLMs is a system that is as powerful as one which an average person can purchase at a big-box store (Best Buy, Microcenter, Costco, etc).
I think my Windows 11 daily driver laptop does reflect an above-average consumer computer:
- Lenovo ThinkPad T14
- AMD Ryzen 7 Pro 8840U (8c/16t)
- 48 GB RAM DDR5-5600
- Radeon 780M integrated GPU

It is a really nice machine, and a good day-to-day workhorse. I also really appreciate the nice OLED 2880x1800 display that it comes with. 🙂
Anyway, this is not a laptop review, but an "LLM inferencing on a CPU" guide! So, let's get to it!
There are always 2 sides to local LLMs. There are those who will try to only run local LLMs, and nothing else. There are others who think local LLMs aren't very useful if they are too small. For me, I argue that I can run an LLM on modest hardware, but how useful it really is depends on how it is being used!
I'll elaborate more on what I mean by this. I am in that group of developers who think that smaller language models can be useful, but at the same time useless. What I mean by use case is that there needs to be consideration that a small language model will never be up to the level of something bigger on the cloud. I believe the common mistake people make when using small language models is the tendency to replace the state of the art (SOTA) cloud models with the local small language models with the expectation they can do everything.
No, we need to be more practical! We need to shift the mindset a bit here and understand that there are some things which a local small language model is good at, and some things which a cloud-based large language model is just plain better at. Some things I can think about when using LLMs on the cloud:
- Chatting. Such as question and answering, bouncing ideas around, and creative writing work
- Data parsing, summarization, and rewriting
- Problem solving, and research-oriented conversations in a multi-turn fashion
Yeah, there is no way a local small language model can compare with what a cloud-based LLM can do in those above scenarios. Let's be realistic. As it turns out, when we are realistic, we can actually come up with some good ways to use local small language models.
A good example of a recent small language model that is quite good is Google's Gemma 3, It's the latest non-reasoning open source model from Google and it comes in 4 different sizes: 1B, 4B, 12B and 27B parameters. It's personally my favorite local model to run at the moment since it is quite versatile. With the amount of system memory I have, I can technically run all variants. However, not everyone can run these, and will most likely be limited to smaller models like for example, the 1B and 4B models.
The key here to think about is that small language models are good for a set of well-defined, small tasks. Smaller models are good for that, and not as good for generating something new, and creative. I think this is where most of us get it wrong. We think smaller models are useless because we try to use them like bigger models. We end up using the wrong tool for the job.
Today in this post, I'll be walking through about setting up your own local LLM with a Gemma 3 4B model (but any other variant will work) and having the model be useful with no GPU required!
I will also be exploring some use cases in which a small local language model such as Gemma 3 4B can be useful to have on your system. This will be capable in running on a normal laptop. How fun!!!
Operating System
This guide is written for any machine running Linux, or Windows 11 with WSL. In my specific laptop, I am running Windows 11 Home Edition with WSL. The specific Linux distribution I am using is Ubuntu 24.04.
If you have Windows 11, and need help in setting up WSL, this guide is helpful: Install WSL | Microsoft Learn. It's as easy as this command:
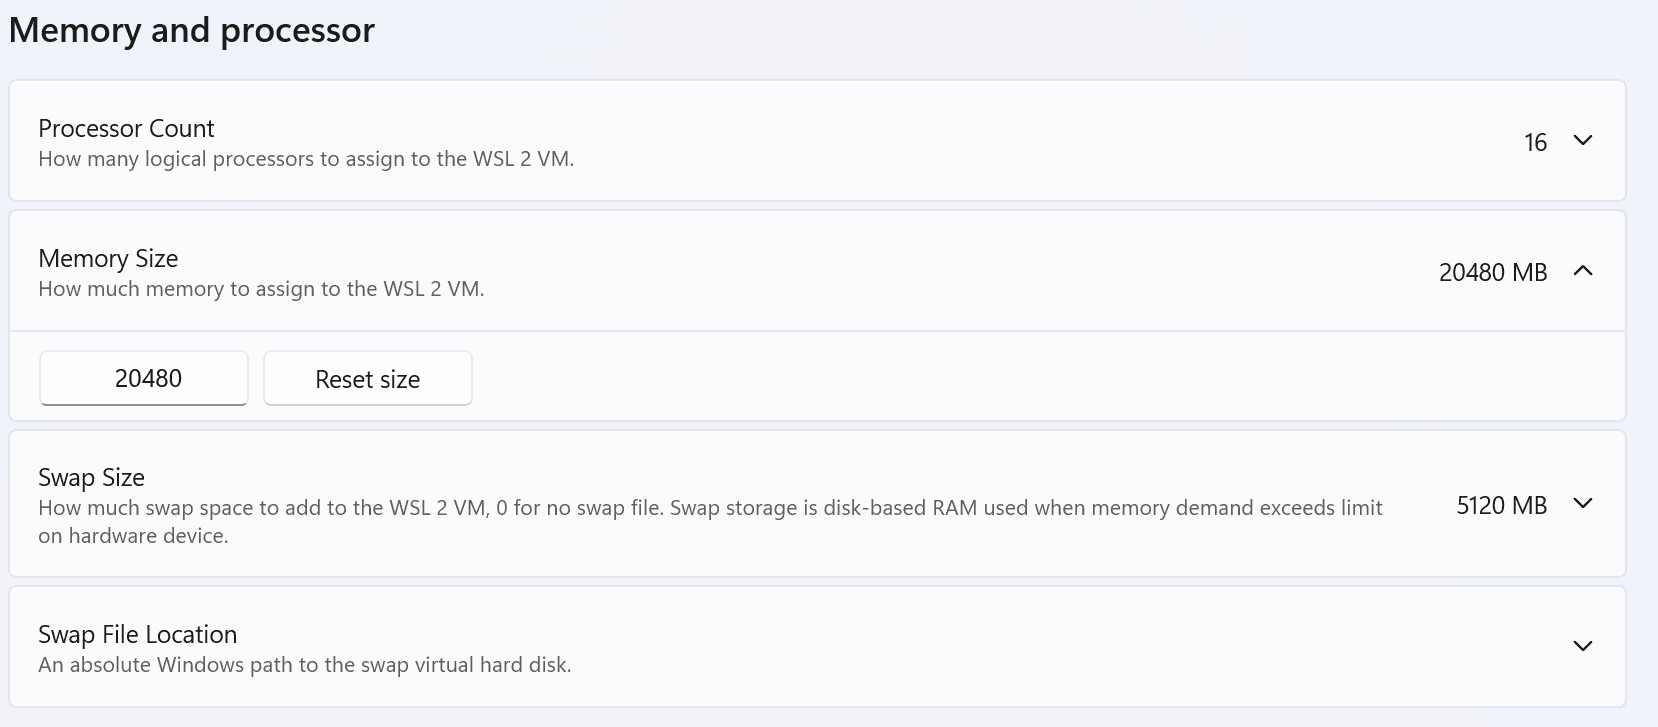
wsl --installMost things will be plug and play in WSL. The only Windows-y thing you'll have to do, if you're using the operating system like me, is to just ensure that your WSL configuration allows for enough memory to maintain a model in your system. The minimum amount you will need on top of the set defaults is about 4 GB of additional memory to run the model.
You can tweak this by going to the WSL Settings and within the Memory and processor view. You can adjust the number of cores and memory available. You can leave everything Windows has configured as default except the Memory Size. In the example shown below, I have 40 GB of usable system memory, I have allocated about 20 GB towards my Linux installation within WSL. Based on my empirical observations, this seems to work pretty well.
Llama.cpp

Llama.cpp will be our inference engine in which we can use to interact with our model. I know most internet resources prefer Ollama, but there are certain quirks/caveats about it that make me steer away from it for my own use. If this is your first time with local LLMs, or even just not being familiar with building applications from source, then most likely, Ollama is a perfect way to start. I will be clear though, for this blog post, I am only going to be using llama.cpp as the inference engine.
Environment Setup
The environment setup instructions I've presented here works with Ubuntu 24.04.2 (or Ubuntu on Windows). I think it should work other distributions, as long as you adjust usages of the package manager as appropriate. 🙂
Me being on Ubuntu means you're going to see a lot of sudo apt install in this article. If you use Fedora, or anything else, you can just replace that with your favorite package manager installer thing. I am pretty sure you'll eventually get to the same place. (If you're on anything else not on Ubuntu, I am assuming you have the technical skill color outside the lines)
One of the cool things about llama.cpp is that it is written in pure C/C++, and very little dependencies are necessary to build it. I have never had trouble building llama.cpp at all due to its simplicity. For the environment, we really only need a few things.
Here's the main things you'll need:
- Git
- Git LFS
- Python 3.12.3 (with venv module)
- C build tools like gcc, and cmake
System Dependencies
Most of the thngs we need to install are really for PyEnv to help us manage Python versions. llama.cpp itself really only requires gcc and cmake. First, let's get our system up to date, and make sure we have gcc and cmake installed:
# Update the system
sudo apt update && sudo apt upgrade -y

# Install all the necessary dependencies
sudo apt install build-essential \
	make \
	cmake \
	git \
	git-lfs \
	curl \
	xz-utils \
	libbz2-dev \
	libncurses-dev \
	libreadline-dev \
	libsqlite3-dev \
	libssl-dev \
	xz-utils \
	tk-dev \
	libffi-dev \
	liblzma-dev \
	libsqlite3-dev \
	libssl-dev \
	libcurl4-openssl-dev \
	tmux \
	zlib1g-dev -y
Initialize git-lfs with:
git lfs install
Python Setup
Everything works flawlessly if your system is on Python 3.12.3. It's what I've tested on, and so I can guarantee that it will work. Let's get the right version of Python 3.12.3 and make this our global Python version. We can use PyEnv to do this. Install PyEnv using this command:
curl https://pyenv.run | bashAfter PyEnv is installed, you will get a notice about making PyEnv load automatically by appending some bash script to the .bashrc. You can do that and restart the shell environment.
# Load pyenv automatically by appending
# the following to
# ~/.bash_profile if it exists, otherwise ~/.profile (for login shells)
# and ~/.bashrc (for interactive shells) :

export PYENV_ROOT="$HOME/.pyenv"
[[ -d $PYENV_ROOT/bin ]] && export PATH="$PYENV_ROOT/bin:$PATH"
eval "$(pyenv init - bash)"

# Restart your shell for the changes to take effect.

# Load pyenv-virtualenv automatically by adding
# the following to ~/.bashrc:

eval "$(pyenv virtualenv-init -)"
Now, we can install Python 3.12.3 and make it our default Python version followed by ensuring we have venv installed:
pyenv install 3.12.3 && \
pyenv global 3.12.3 && \
sudo apt install python3.12-venv -y
You can then test to see if all that worked if you run the command to check the Python version:
python3 --versionIf you see the expected version, then you are set!
3.12.3Building llama.cpp
Clone the llama.cpp Repository
git clone https://github.com/ggml-org/llama.cppllama.cpp consists of in addition to C the code, a handy set of Python scripts which allows us to convert HuggingFace safetensors to gguf. To manage the large amount of Python dependencies, we can create a virtual environment. If you aren't familiar with how packages/dependencies work in Python, virtual environments are just a more sandbox-y way of handling external packages to be accessed by scripts running under that virtual environment.
Create a virtual environment somewhere in the repo. I just create it in the project root.
python3 -m venv .venvActivate it the virtual environment.
source .venv/bin/activateInstall the required dependencies from the llama.cpp project root:
pip install -r requirements.txtIt'll be a while since it installs a bunch of stuff, but basically it installs all dependencies necessary to run the python scripts in the repo.
Now it is time to build llama.cpp. To make things easier, we can build a statically linked version of it. Here are some parameters you may want to tweak:
CMAKE_INSTALL_PREFIX- This is the install prefix, meaning the destination directory to install all the llama.cpp binaries. Make sure that the directory exists.BUILD_SHARED_LIBS- I left it OFF here because it is easier to manage a statically linked binary.
# Create the build configuration
cmake -B build -DBUILD_SHARED_LIBS=OFF -DCMAKE_INSTALL_PREFIX=$HOME/bin/llama.cpp -DLLAMA_BUILD_TESTS=OFF -DLLAMA_BUILD_EXAMPLES=ON -DLLAMA_BUILD_SERVER=ON

# Build llama.cpp with the Release profile using the number of hardware threads available from your CPU
cmake --build build --config Release -j $(nproc)
Additionally, if your CPU supports AVX512, you can also add the -DGGML_AVX512=ON to the build script. My Ryzen 7 8840U CPU has support for this, and I turn it on for further optimizations. Since not every CPU supports this extension, I left it out of the build script for compatibility purposes.
Other switches for accelerators you may find handy:
- DGGML_CUDA=ON - Builds with CUDA (Good for NVIDIA GPUs)
- DGGML_VULKAN=ON - Builds with Vulkan support. (Good for AMD and Intel GPUs)
Once llama.cpp is done building, you can install to your prefix directory with the following command:
cmake --install build --config ReleaseNow llama.cpp is available to be used as your inference engine!
Downloading a Model
An inference engine is not very fun to use if we don't have a model. As mentioned before, we're going to be using Gemma 3 4B. I usually download my models from HuggingFace and then convert them to the appropriate format to run in llama.cpp.
Get the Gemma 3 4B model: google/gemma-3-4b-it · Hugging Face. The "it" suffix just means that the model has been instruction fine-tuned after the pre-training process. That means this model is great for prompting/giving instructions to be followed.
Downloading the repository means to just use git to clone it. You can download the entire repository with this command:
git clone https://huggingface.co/google/gemma-3-4b-itYou'll get an error if you are not authenticated to HuggingFace, and have yet to accept the license for Gemma 3 in the model card page. So be sure to do that.
Since these repositories can be quite large, you will only clone the objects that are not considered to be LFS objects. You will need to fetch and pull those separately. Once you clone the repository, you will need to fetch the large objects:
git lfs fetch
git lfs pull
Converting and Quantizing the Model
Now, let's see what's in the model directory. Notice if you look into the directory, you'll have 2 safetensors file. We will need to convert these to a gguf file. In order to do that, let's go back to the llama.cpp repository with cd and run the convert_hf_to_gguf.py script to convert the safetensors to gguf. Here is an example usage of it:
python convert_hf_to_gguf.py --outfile ~/models/gemma-3-4b-it.gguf $HOME/models/gemma-3-4b-itYou'll just need to provide the path to where all the safetensors are. Watch out for disk usage. The problem is that this model, although 4B parameters is quite large! It is 7.6 GB. We can solve that through quantization, where we will compress the model by reducing the precision of the parameters. The quality loss will become apparent as we quantize down to lower bit-levels, but we'll experiment with several quantization levels to see the effects of lower precision. (Q6_K, Q5_K, and Q4_K_M).
To get an understanding on some of these levels, you can run the program and command: ./llama-quantize --help and a nice chart will appear and hint at what you would expect from quantizing a model down t a certain level.
./llama-quantize $HOME/models/gemma-3-4b-it.gguf $HOME/models/gemma3-4b-it-q6_k.gguf Q6_K $(nproc)Quantizing to Q6_K takes the model down to about 3.1 GB. This brings benefits such as reducing the amount of system RAM required to inference and also improving the inference speed as there is less data to move around in memory. Overall, we achieve more than 2x savings by quantizing the model.
Running the Model
Now let's actually run the model. We will run the llama-server program to allow us to have a REST API to interface with the model. The server program also exposes a web front end in which a host and port are used so that we can use to send queries to the LLM. We can use the recommended parameters by Unsloth/Google team to get the best experience out of Gemma 3.
The settings are basically:
seed3407prio2temp1.0repeat-penalty1.0min-p0.01top-k64top-p0.95
The rest of the arguments I specify is just my preference, but you may want to tune the context window to be smaller or larger through -c argument if you'd like. I prefer a window of 32768 tokens.
$HOME/bin/llama.cpp/bin/llama-server -m $HOME/models/gemma3-4b-it-q6_k.gguf --host 0.0.0.0 --port 5432 -ngl 0 -c 32768 -t 8 --seed 3407 --prio 2 --temp 1.0 --repeat-penalty 1.0 --min-p 0.01 --top-k 64 --top-p 0.95 --mirostat 2Navigating to http;//localhost:5432, we're presented with a pretty basic web application:
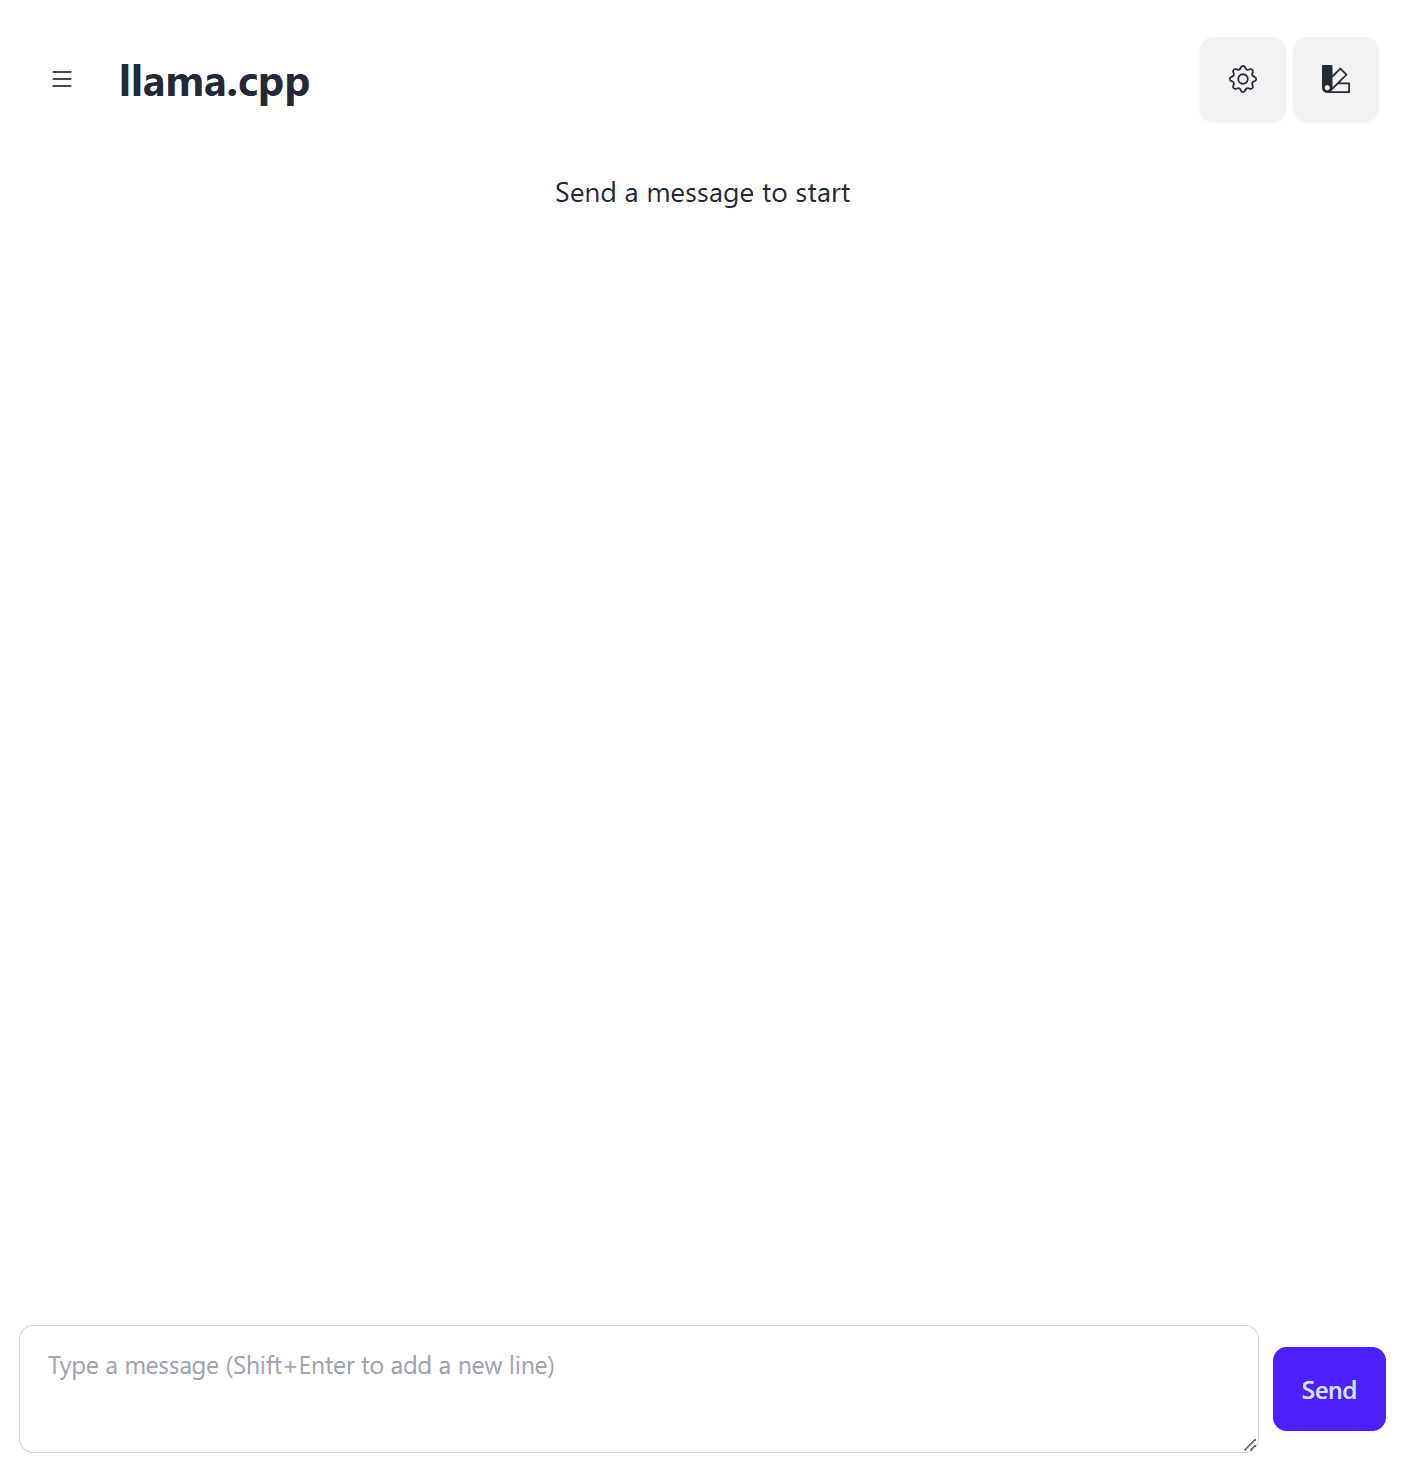
Let's send a basic message to see the model start chatting. The model should respond quickly!

Model System Performance
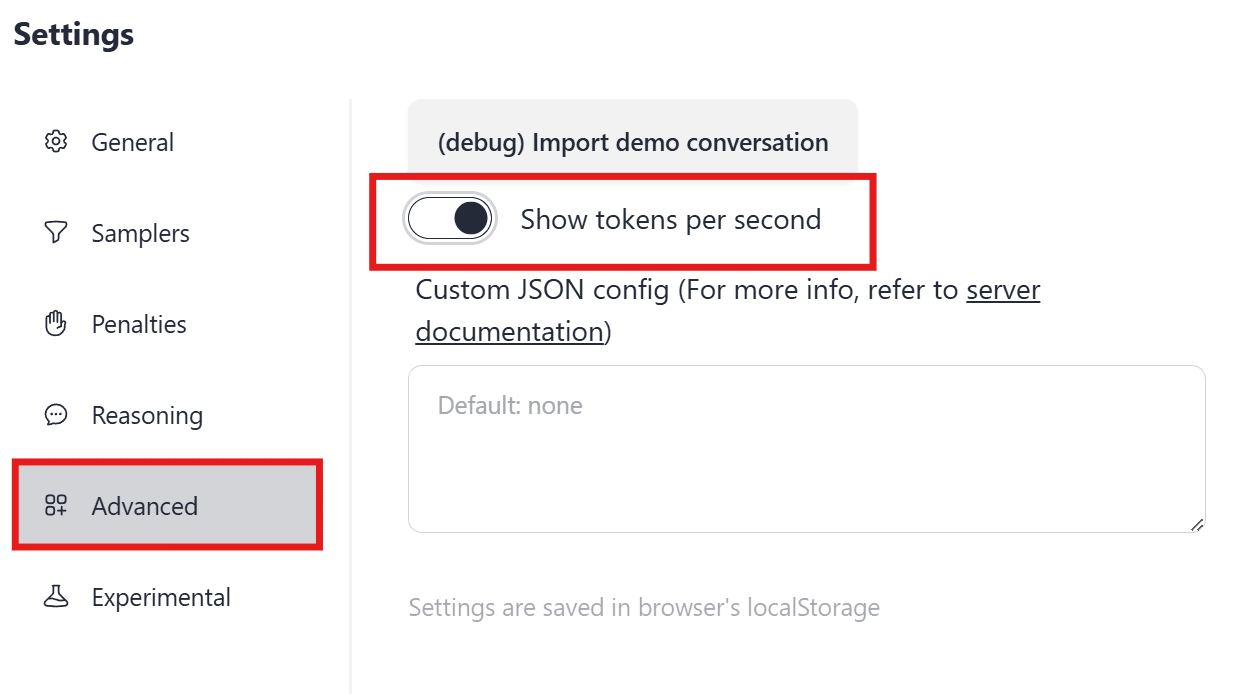
Great, everything works so far. Now, let's do one thing -- let's show some statistics to see how many tokens per second our 4B Q6_K quantized model is generating.
To test, let's give a more substantial prompt to the LLM. How's something with clouds and thunderstorms?
what kind of clouds produce thunderstorms?Immediately, after sending, we'll start to see tokens generating. The response for the Q6_K quantized model is:
Okay, let's break down the types of clouds that typically produce thunderstorms! It's a fascinating and sometimes dramatic weather phenomenon. Here's a breakdown, focusing on the key cloud types involved:

**1. Cumulonimbus Clouds – The Main Players**

* **These are *the* thunderstorm clouds.** They're the most important cloud type to understand when it comes to thunderstorms.
* **Appearance:** They're massive, towering, and often dark gray or black. They can look like enormous anvils when they're high up.
* **Formation:** Cumulonimbus clouds form when warm, moist air rises rapidly. This rising air cools, and water vapor condenses, forming the cloud.  Instability in the atmosphere – meaning warm air near the surface and cold air aloft – is crucial for their development.
* **Characteristics:** They're characterized by strong updrafts (rising air) and downdrafts (falling air).  Within these clouds, you'll find:
    * **Anvil Top:**  As the cloud rises very high into the stratosphere, it spreads out and forms a flat, anvil-shaped top.
    * **Updrafts:**  These are the source of the intense precipitation (rain, hail, snow) and often the lightning.
    * **Downdrafts:** Cool air rushing down from the top of the cloud, often leading to heavy rain and sometimes even a “gust front” – a sudden, strong shift in wind direction and speed.


**2. Supporting Cloud Types (Often Present)**

* **Cumulus Clouds (Developing):**  You’ll often see smaller, puffy cumulus clouds *ahead* of a developing thunderstorm.  These can be a sign that conditions are favorable for cumulonimbus development. They’re not themselves thunderstorm clouds, but their growth is a key indicator.
* **Altocumulus Clouds:** Sometimes, you can see altocumulus clouds (layered, puffy clouds) in advance of a thunderstorm. These can indicate atmospheric instability.

**Here’s a simplified breakdown of how it all works together:**

1. **Instability:** Warm, moist air near the surface is forced upwards by a lifting mechanism (like a front, mountain slope, or intense solar heating).
2. **Rising Air & Condensation:** As the air rises, it cools, and water vapor condenses to form cumulus clouds.
3. **Growth & Updrafts:**  If the air continues to rise rapidly and remains moist, the cumulus clouds can grow into towering cumulonimbus clouds.
4. **Thunderstorm Development:** Strong updrafts within the cumulonimbus cloud carry moisture high into the atmosphere, where it freezes and forms precipitation. The downdrafts then bring the precipitation back down to the surface.

**Important Note:** Thunderstorms can form in different atmospheric conditions, and there are variations on this basic process.

**Resources for More Information:**

* **National Weather Service:** [https://www.weather.gov/](https://www.weather.gov/) – Look for information on severe weather and thunderstorm forecasting.
* **National Geographic - Clouds:** [https://www.nationalgeographic.com/environment/weather-climate/types-of-clouds/](https://www.nationalgeographic.com/environment/weather-climate/types-of-clouds/)


Do you want me to delve deeper into a specific aspect, such as:

*   The different types of lightning?
*   The formation of hail?
*   How weather forecasting helps predict thunderstorms?
The response seems OK. Is it good? I am not sure. But let's actually think about the quality later. For now, let's take a look at the tokens per second our 4B model generated using CPU inference: 7.3 tokens/s!

7 tokens per second is pretty slow, but it is still at a speed where I can read comfortably without the LLM moving too fast or slow. It's not bad, but I think we can go a little faster.
Let's now try quantizing the model to Q5_K. Now this means on average we'll see numbers be stored as 5-bit integers on average in the model file. How much savings do we get? Well as it turns out, we go from 3.1 GB with our Q6_K to 2.82 GB with Q5_K. Did we lose too much? Let's see.
Let's give the same prompt, and the result we get is:
Okay, let's talk about the clouds that produce thunderstorms! It's a fascinating process. Here's a breakdown of the types of clouds involved and what’s happening:

**The Key Players: Cumulonimbus Clouds**

The vast majority of thunderstorms are produced by a specific type of cloud: **Cumulonimbus (Cb) clouds**.  Let’s break down what makes them special:

* **What they are:** Cumulonimbus clouds are massive, towering vertical clouds. They’re essentially the “thunderstorm clouds.”
* **Formation:** They form when warm, moist air rises rapidly into the atmosphere. This often happens due to:
    * **Heating of the ground:**  Warm ground heats the air above it, causing it to rise (convection).
    * **Frontal lifting:** When a cold front (a boundary between cold and warm air) pushes underneath warm air, it forces the warm air upwards.
    * **Orographic lifting:** When air is forced to rise over a mountain range.

* **Structure:**  Cumulonimbus clouds have a distinctive layered structure:
    * **Bottom (Cumulus Stage):** Starts as a puffy, towering cumulus cloud – often looking like cauliflower.
    * **Middle (Mature Stage):**  This is where the thunderstorm really develops.  You’ll see strong updrafts (rising air) and downdrafts (falling air). Precipitation (rain, hail, snow) begins to fall.
    * **Top (Anvil Stage):** As the rising air reaches the stable stratosphere, it spreads out horizontally, forming a flat, ice crystal-based top called an anvil. This anvil is a hallmark of a mature thunderstorm.


**Other Cloud Types Involved (but less directly):**

* **Cumulus Clouds:** While *smaller* cumulus clouds are common and beautiful, they are *not* thunderstorms on their own. They need the right ingredients (moisture and instability) to grow into cumulonimbus.
* **Altocumulus Clouds:** These mid-level clouds can sometimes *precede* a thunderstorm, indicating instability in the atmosphere. However, they don’t *produce* the storm themselves.

**Important Note:** Thunderstorms are complex systems. They often involve a whole chain of cloud development and interactions, not just a single type of cloud.

**Resources for More Information:**

* **National Weather Service:** [https://www.weather.gov/](https://www.weather.gov/) – Excellent for current weather information and explanations of weather phenomena.
* **National Geographic - Thunderstorms:** [https://www.nationalgeographic.com/environment/natural-disasters/thunderstorms/](https://www.nationalgeographic.com/environment/natural-disasters/thunderstorms/)


Do you want me to delve deeper into a specific aspect of thunderstorms, such as:

*   The different stages of a thunderstorm?
*   The ingredients needed for thunderstorm formation?
*   The types of precipitation you might see in a thunderstorm?
Hm, to be honest, I think this response might be better than the one the Q6_K generated. It definitely gives me more scientific information. How about the tokens per second? 7.9 tokens/s!
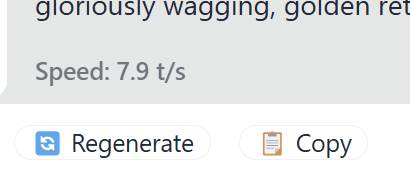
Although I measured 7.9 tokens/s, I did see a few bursts of 8+ tokens/s. Overall, not very bad at all for an LLM running on a typical laptop. I am very surprised still to see us being able to run an AI on our personal computers on less than 4GB of additional RAM. That is wild.
I don't want to stop there yet. If you have ever downloaded models off of Ollama or LM Studio, you'll find that most models by default are quantized to Q4_K_M. I think in practice this quantization level is said to give a good balance between achieving performance with not too much quality loss. I believe this is why it is such a popular quantization level.
How much savings do we get going from Q5_K to Q4_K_M? Looks like we reduce the model's size from 2.82 GB to 2.5 GB!
Giving the same prompt, we get another different answer:
Okay, let's break down the types of clouds that typically produce thunderstorms! It's not just *any* thunderstorm cloud, but specific cloud formations are key. Here’s a breakdown:

**1. Cumulonimbus Clouds – The Heavy Hitters**

* **These are the *primary* clouds responsible for thunderstorms.**  They are the big ones, the ones that look like massive, towering mountains in the sky.
* **Formation:** Cumulonimbus clouds form when moist, unstable air rises rapidly. This rising air cools and condenses, releasing latent heat which fuels further upward growth.
* **Appearance:** They have a dark, ominous base and often a flattened, anvil-shaped top (the anvil is formed when the rising air hits the stable air above and spreads out horizontally).
* **What they bring:**  They are associated with:
    * Heavy rain (sometimes torrential)
    * Lightning
    * Thunder
    * Hail (often large hailstones)
    * Strong winds (including potentially damaging downbursts)


**2.  Other Cloud Types that Contribute (Often in Combination with Cumulonimbus)**

* **Cumulus Clouds (Large, Towering):** While regular cumulus clouds don’t *produce* thunderstorms on their own, *developing* cumulus clouds can sometimes grow vertically into cumulonimbus. If they get tall enough and the atmosphere is unstable, they can become thunderstorm clouds.
* **Altocumulus and Altostratus Clouds (Sometimes):**  Sometimes, these mid-level clouds can be part of the setup that leads to thunderstorm development. They can indicate instability in the atmosphere. However, they generally don’t produce the intense, localized heavy rain and lightning of a full thunderstorm.


**Key Factors for Thunderstorm Cloud Development:**

* **Instability:** This is *crucial*.  Instability means that a parcel of air, if lifted, will continue to rise on its own because it’s warmer and less dense than the surrounding air.
* **Moisture:**  A plentiful supply of moisture is needed for the clouds to grow and release the heavy rain.
* **Lift:**  Something needs to initially push the air upwards. This can be:
    * **Heating of the ground (convection):** This is the most common cause –  warm air rises.
    * **Fronts:**  A cold front or warm front forcing warmer air upwards.
    * **Mountains:** Orographic lift – air forced upwards as it hits a mountain range.


**Resources for Further Learning:**

* **National Weather Service:** [https://www.weather.gov/](https://www.weather.gov/) - Excellent information on weather hazards, including thunderstorms.
* **National Geographic - Clouds:** [https://www.nationalgeographic.com/environment/weather/phenomena/clouds/](https://www.nationalgeographic.com/environment/weather/phenomena/clouds/)

---

Do you want me to delve deeper into a specific aspect of this, such as:

*   The different stages of thunderstorm development?
*   The science behind lightning and hail?
*   How weather forecasting helps predict thunderstorms?
On average, this answer generated at an average of 9.9 tokens/s.
Overall, when it comes to prompt generation, we are able to go decently fast on CPU. This is actually fast enough for some of the use cases a small model provides (more on that later).
Generation Performance Analysis
Now that have 3 options of a quantized model to choose from: Q6_K, Q5_K, Q4_K_M, all seem to generate something pretty good. But which is best? For that, we can actually leverage a larger LLM to be the judge!
A common pattern in fine-tuning for instruction is to not only have a human judge whether an LLM response is good or bad, is to also leverage a "smarter" LLM to also give an opinion and choose the best answer based on criteria.
I am lucky to also have a subscription to OpenAI and access to o1, so we can use that model to help tell us which may be the best model. In our test we'll use the answer Q5_K generated as "A", Q6_K as "B", and Q4_K_M as "C":
| Quantization | Label |
| Q5_K | A |
| Q6_K | B |
| Q4_K_M | C |
I just rearranged the models quantized at the various levels to ensure that o1 doesn't get lazy 😅.
Here's the prompt that I gave:
I need your help evaluating responses from a small language model. I'll give you a prompt, and 3 different answers. Answer A, B, C. Given the user prompt, and these answers, rank the answers from best to worst

Prompt:
> what kind of clouds produce thunderstorms?

Response A:
[copied content]

Response B:
[copied content]

Response C:
[copied content]
I didn't give much restriction as I wanted to give the LLM some flexibility. Here is what o1 responded with:
 **Ranking from Best to Worst**

1. **Response A**
   - **Why it’s best:** It directly identifies *cumulonimbus* as the key thunderstorm cloud, then goes a step further by breaking down the *distinct stages* of thunderstorm development (cumulus stage, mature stage, anvil stage). It also explains the specific lifting mechanisms (heating, frontal, orographic) and briefly covers how other cloud types (like cumulus, altocumulus) fit into the bigger picture. The structure is clear and detailed, making it very helpful and comprehensive.

2. **Response B**
   - **Why it’s second:** It also does an excellent job pinpointing cumulonimbus as the primary thunderstorm producer, describes how they form, and lists important details like heavy rain, lightning, and hail. It includes mentions of altocumulus/altostratus as precursors and delves into the key factors (instability, moisture, lift). It’s thoroughly correct and well organized, but offers slightly less stage-by-stage depth than Response A.

3. **Response C**
   - **Why it’s third:** It correctly highlights cumulonimbus clouds as *the* thunderstorm clouds and does a nice job describing their structure (anvil top, updrafts, downdrafts) and mentioning supporting cloud types. It’s still a solid explanation, but compared to A and B, it covers slightly fewer additional details (for instance, it omits altostratus and doesn’t explicitly outline the classic “cumulus → mature → anvil” stages). It’s a good answer, just not as in-depth as the first two.
Interesting! o1 liked Q5_K's response best, followed by Q6_K and then Q4_K_M. I expected Q4_K_M to be the worst, but I didn't think that Q5_K would be better. I do think that both the Q5_K and Q6_K quantization levels are good though.
Let's test this even further.
Vision
But that's still not enough. One of the cool things the 4B model has is its ability to perform vision analysis as it is multi-modal. Let's see how it does with vision, or more commonly known as image recognition tasks.
In order to make this work with llama.cpp, we need the mmproj file associated with the model. We can extract that from the original model with a script, but that's beyond the scope of this blog post, so here is a direct download link:
mmproj - https://huggingface.co/ggml-org/gemma-3-4b-it-GGUF
Now, let's also use a test image. Here is a picture of an NVMe SSD from my desktop:
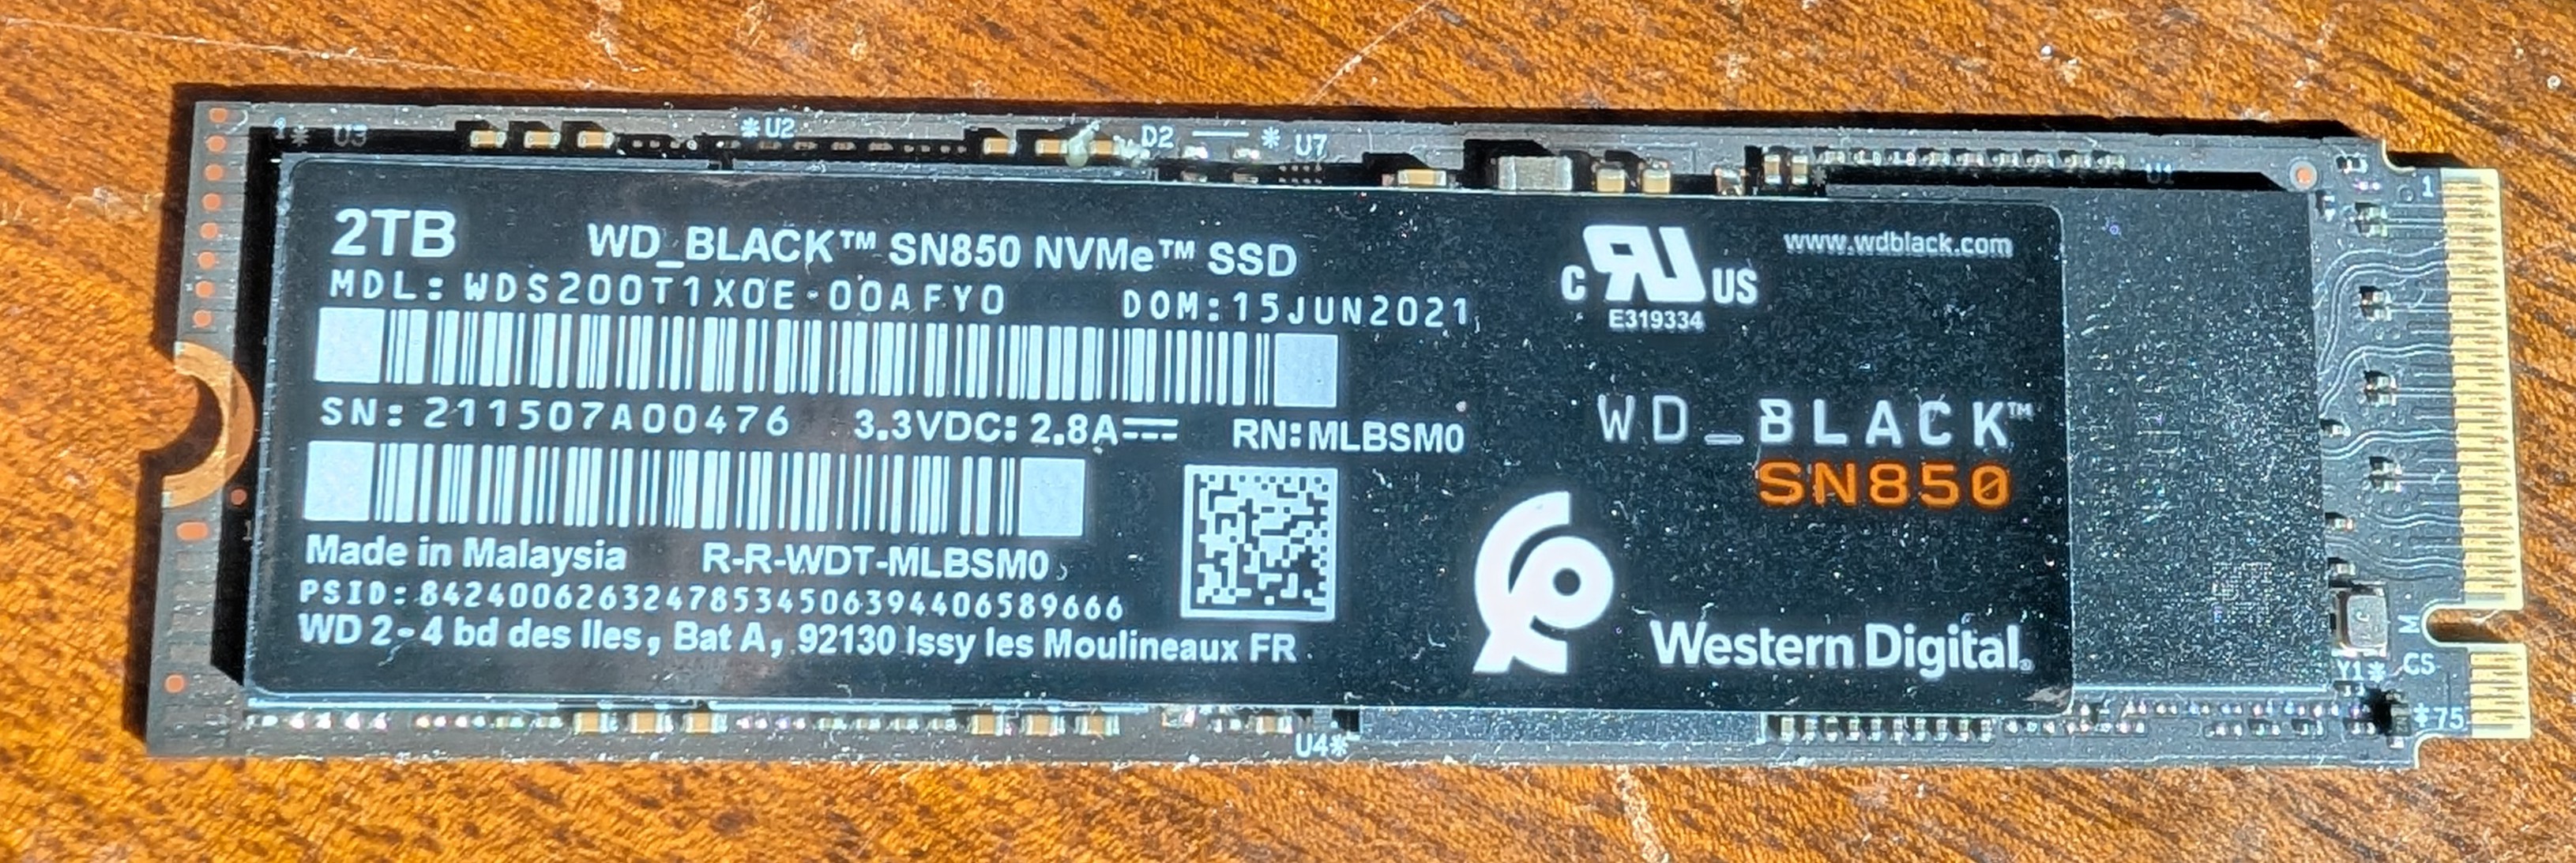
The task is simple, I will provide the prompt:
This is a picture of an M.2 NVMe SSD. Can you tell me the brand, model number, serial number, capacity and date of manufacture?
As of March 2025, we can't really run vision tasks the same way we have with chat. We will need to use the llama-gemma3-cli for this. An example command to run vision task is this:
./llama-gemma3-cli -m $HOME/models/gemma3-4b-it-q6_k.gguf --mmproj $HOME/models/gemma-3-4b-it-GGUF/mmproj-model-f16.gguf --image $HOME/temp/ssd.jpg -p "This is a picture of an M.2 NVMe SSD. Can you tell me the brand, model number, serial number, capacity and date of manufacture?"I think for workloads deployed on production you'll probably want a wrapper script around to invoke vision tasks conveniently. If you're a developer, you probably already see this.
Setting expectations, when it comes to numbers, I am always nervous in way that I know these AI models always seem to have a little trouble with extracting strings of alphanumeric characters. A year or so ago, this used to be a huge problem from my personal experience. But I've noticed it has gotten better across more recent models.
Now here are the results generated by each quantization of the model:
Q6_K
main: /home/rngo/models/gemma3-4b-it-q6_k.gguf
Encoding image /home/rngo/temp/ssd.jpg
Image encoded in 32241 ms
Image decoded in 7947 ms
Okay, let's break down the information from the image of the SSD:

*   **Brand:** Western Digital (WD)
*   **Model Number:** WD_BLACK SN850
*   **Serial Number:** 211507A00476
*   **Capacity:** 2TB
*   **Date of Manufacture:** 15 JUN 2021

Let me know if you'd like me to extract any other details from the image!
I think Q6_K really nailed it! I really love how Date of Manufacture was recognized on the SSD as "DOM". Gemma 3 4B picked that up perfectly! The serial number was extracted perfectly, and the model was able to understand that WD_BLACK SN850 is the model. I actually was looking for this rather than the model number as stated in my prompt, so I am surprised it picked up my human preferences in that way.
Overall, this was a good result.
Q5_K
main: /home/rngo/models/gemma3-4b-it-q5_k.gguf
Encoding image /home/rngo/temp/ssd.jpg
Image encoded in 35985 ms
Image decoded in 8658 ms
Okay, let's break down the information from the image of the M.2 NVMe SSD:

*   **Brand:** WD\_BLACK (Western Digital's premium gaming brand)
*   **Model Number:** SN850
*   **Serial Number:** 211507A00476
*   **Capacity:** 2TB
*   **Date of Manufacture:** 15 JUN 2021

Let me know if you'd like me to extract any other details from the image!
More or less the same as the Q6_K, but too bad it missed the WD_BLACK and confused it as the brand! It's an important part of the model as Western Digital uses WD Black as nomenclature to describe their high-end SSD line. SN850 is really hard to discern whether it is a high-end SSD alone. I am still impressed about the rest of the data, especially being able to parse out the serial number!
Q4_K_M
main: /home/rngo/models/gemma3-4b-it-q4_k.gguf
Encoding image /home/rngo/temp/ssd.jpg
Image encoded in 32975 ms
Image decoded in 4554 ms
Okay, let's break down the information from the image of the M.2 NVMe SSD:

*   **Brand:** Western Digital (WD)
*   **Model Number:** WD_BLACK SN850
*   **Serial Number:** 211507A00476
*   **Capacity:** 2TB
*   **Date of Manufacture:** 15 JUN 2021

Let me know if you'd like to extract any other details from the image!
VERY Interesting that this result was better than Q5_K! I really think that this one was decent. In fact, it's the same as the Q6_K result. SO arguably Q4_K_M tied with Q6_K as being the best result.
Q2_K
main: /home/rngo/models/gemma3-4b-it-q2_k.gguf
Encoding image /home/rngo/temp/ssd.jpg
Image encoded in 36738 ms
Image decoded in 6817 ms
Here's the information from the image of the SSD:

*   **Brand:** WD (Western Digital)
*   **Model:** WD BLACK SN850 NVMe SSD
*   **Serial Number:** 21150740046
*   **Date of Manufacture:** 15 JUN 2021 (D.O.M.)
*   **PSID (Product Serial ID):** 842.663.634.785.34.634.666

The image also shows the barcode and QR code for the product.

Do you need any other information?
Just for fun, I quantized the 4B model to Q2_K, and I got a really poor result. The brand, serial number, and additional unwanted information was wrong. It really troubles me that the serial number looks very similar to the real thing, and thus a subtle incorrect result. Subtly wrong is dangerous to me as humans tend to be quite lazy when it comes to scrutinizing data which looks correct from afar. I just wanted to see how a Q2_K quantization would affect the accuracy in this vision recognition task.
A good lesson learned. Q2_K is too much quantization. I wouldn't use it.
Okay, so we know how a 4B model performs on a vision task... Now, what about GPT 4o-mini? Here's what I gave to it:
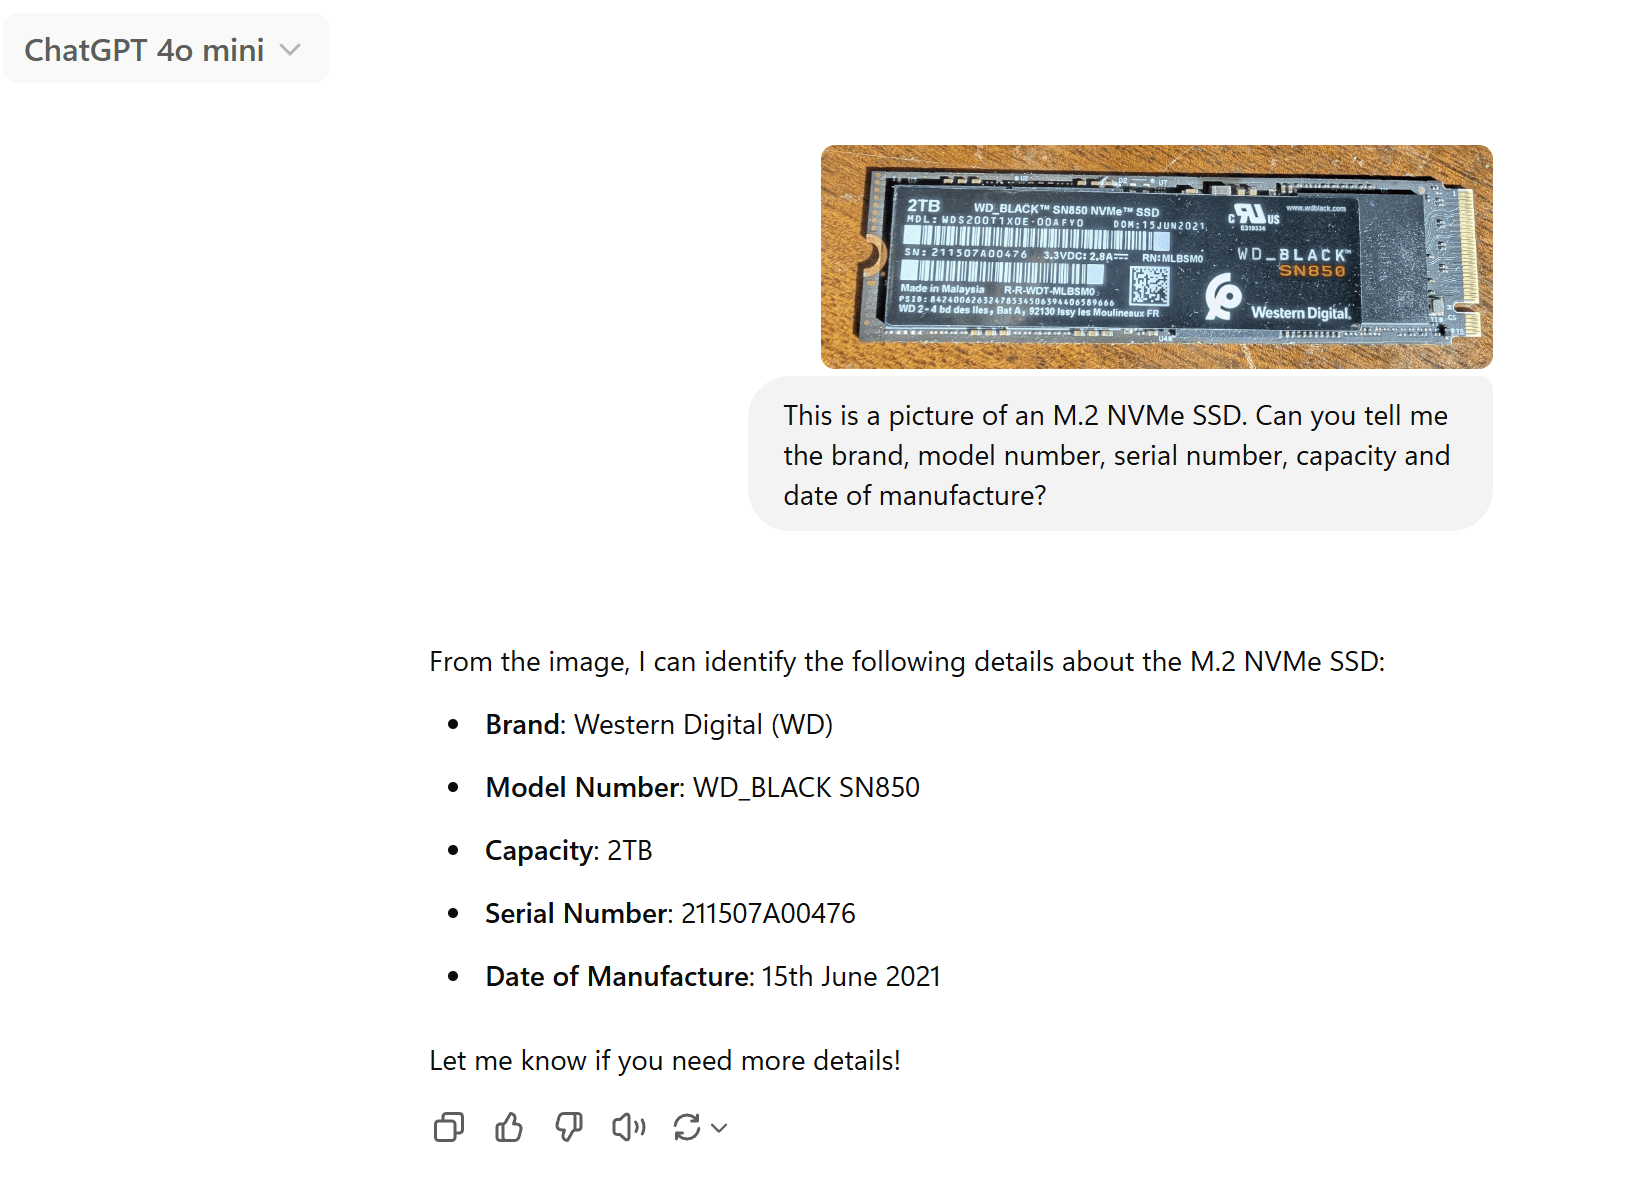
From the image, I can identify the following details about the M.2 NVMe SSD:

- **Brand**: Western Digital (WD)
- **Model Number**: WD_BLACK SN850
- **Capacity**: 2TB
- **Serial Number**: 211507A00476
- **Date of Manufacture**: 15th June 2021

Let me know if you need more details!
Wow, our 4B model with Q6_K quantization is comparable to GPT-4o mini! I am very impressed!!!
Table to CSV Example
At this point I am decided to just use the Q6_K model. I have enough RAM. For the sake in not writing an article that will span a read time of 2 hours, let's proceed in deciding that a Q6_K model will be the model to be used for the rest of the tests. Let's try a couple other examples. One other vision task which is pretty common in my own workflow are tasks which involve converting photos to text. I'm not speaking of descriptions of the photos, but converting figures and charts into text/CSVs, etc. I actually do this quite often since I read a lot of technical books.
Here is one from a textbook:
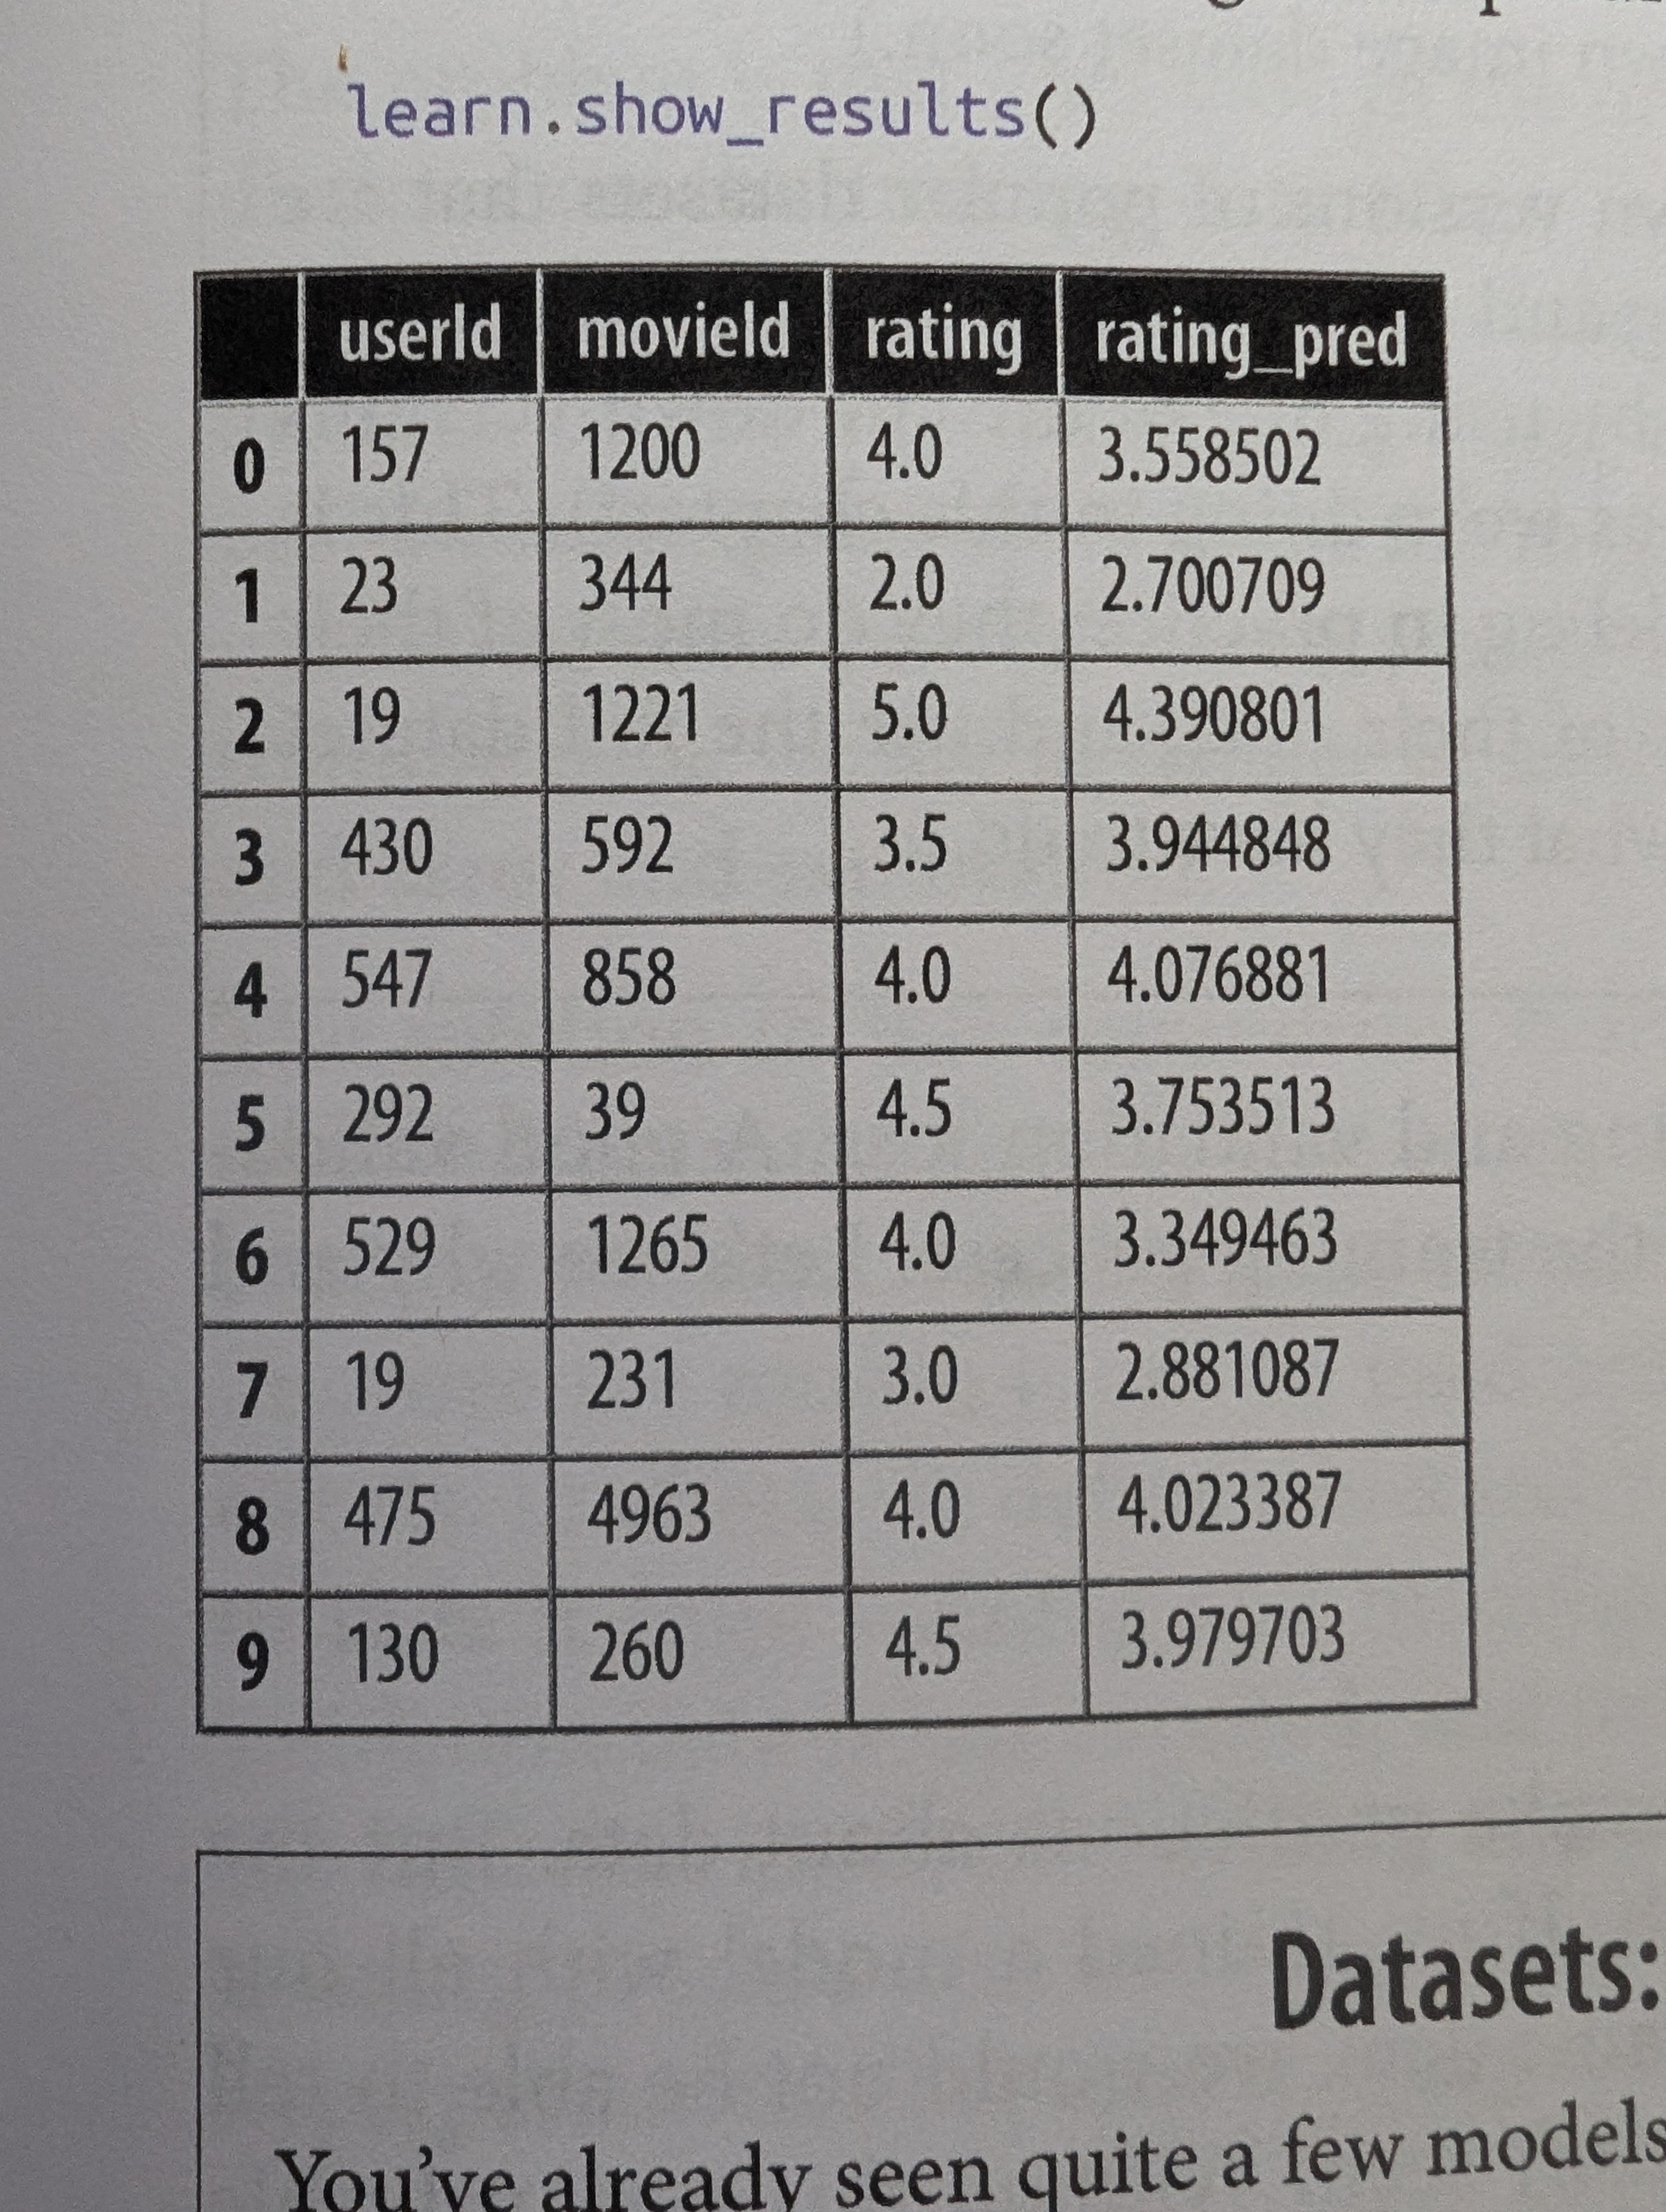
My prompt to convert the image of a table to CSV is:
Can you convert the following table to a CSV? Do note the first column header has no name and is just an id.Running the same llama-gemma3-cli tool, the model responds with:
```csv
id,user_id,movie_id,rating,rating_pred
0,157,1200,4.0,3.558502
1,23,344,2.0,2.700709
2,19,1221,5.0,4.390801
3,430,592,3.5,3.944848
4,547,858,4.0,4.076881
5,292,39,4.5,3.753513
6,529,1265,4.0,3.349463
7,19,231,3.0,2.881087
8,475,4963,4.0,4.023387
9,130,260,4.5,3.979703
```
I think it is really good result. My main concern with these models is that when lots of numbers are involved, the model will almost always get something wrong. 😆
What will GPT 4o mini give us?
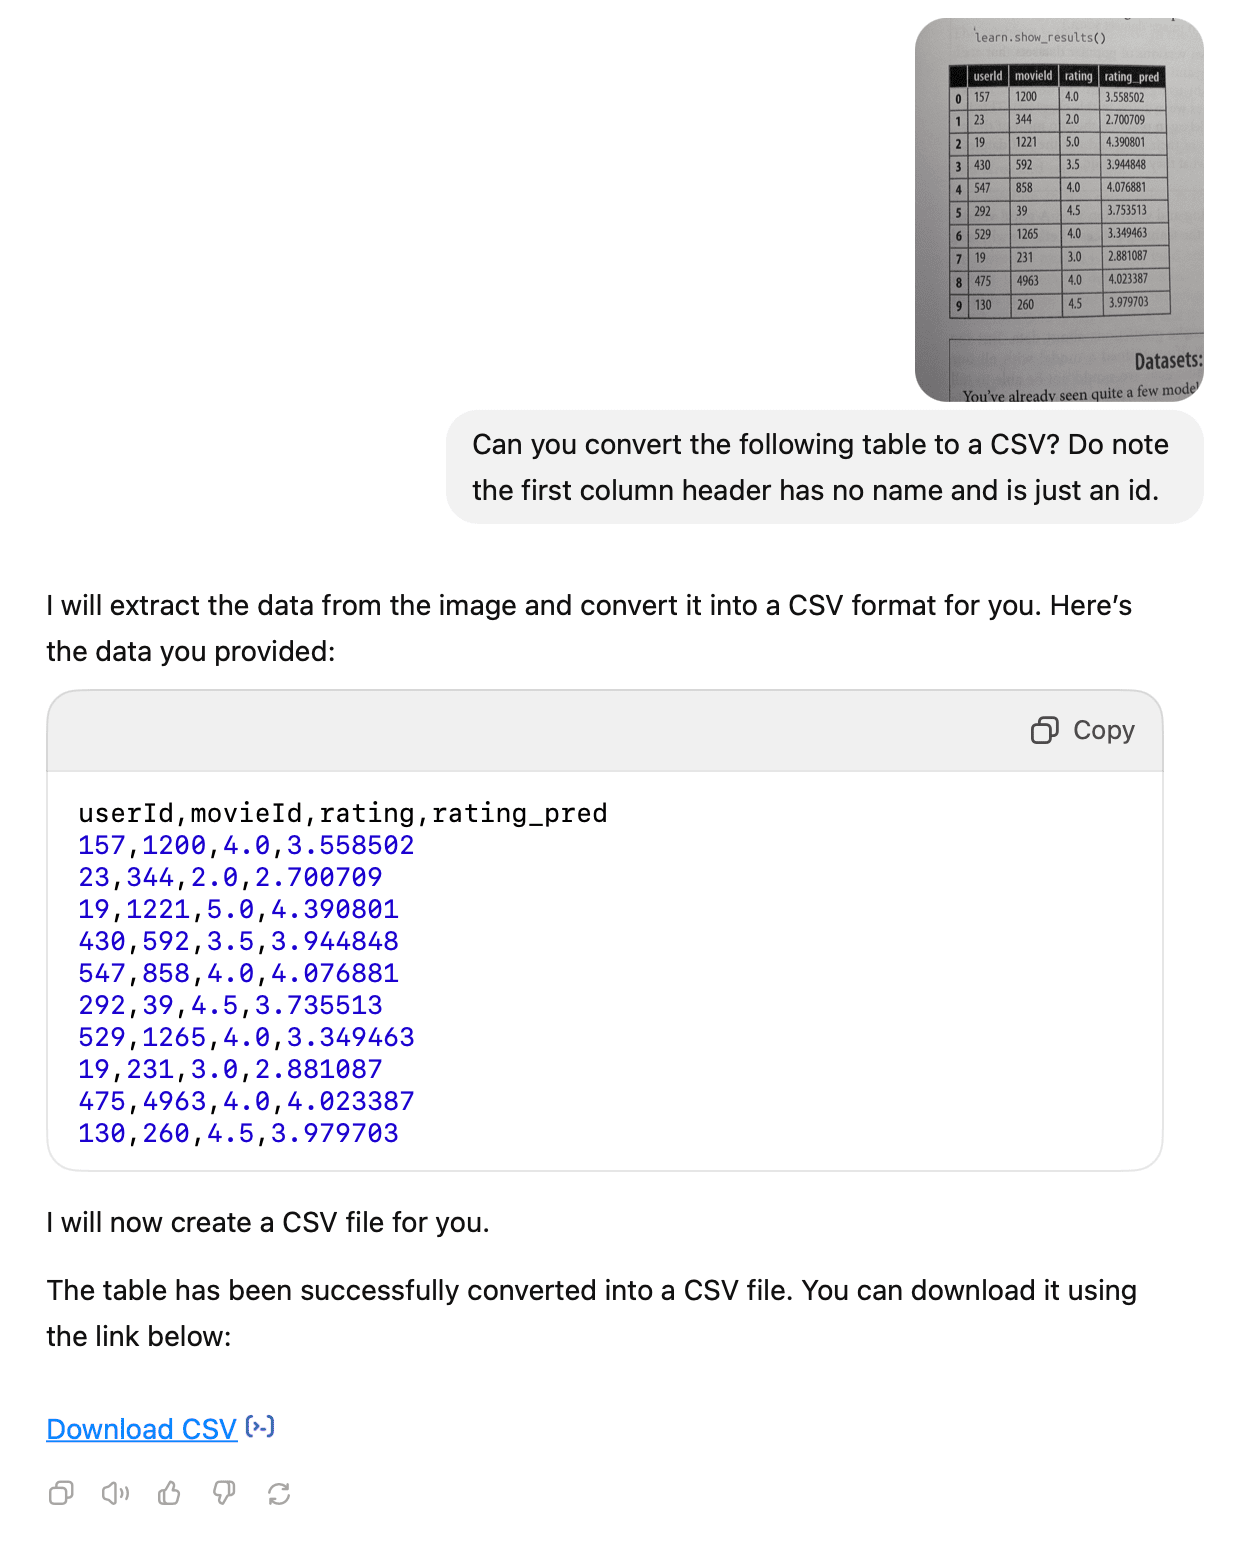
userId,movieId,rating,rating_pred
157,1200,4.0,3.558502
23,344,2.0,2.700709
19,1221,5.0,4.390801
430,592,3.5,3.944848
547,858,4.0,4.076881
292,39,4.5,3.735513
529,1265,4.0,3.349463
19,231,3.0,2.881087
475,4963,4.0,4.023387
130,260,4.5,3.979703
Surprise! The local model actually did better! GPT 4o-mini missed the first column. I think it is pretty surprising too since I had explicitly stated that the first column corresponds to an id. That is amazing to know that a local model can be better than a cloud model in certain tasks.
Tool Calling
Lastly! Tool calling. Gemma 3 doesn't officially support tool calling, but we can prompt Gemma 3 to generate responses which look like messages that will allow us to parse as calls to a tool. All we need is a consistent schema.
Also, for extra reading, there is real guidance from Google in how to actually do function/tool calling with Gemma. Referenced here: Function calling with Gemma | Google AI for Developers.
The gist is to just force some strict schema for the model to work with and make sure when implementing your code, you're able to recognize that the model has responded with what aligns with a tool call.
Here's an example prompt that I gave to the model.
You are an assistant tasked with 3 specific job roles

**Role 1 - JSON Tool Call Generator**

You will provide responses in JSON format representing tool calls, adhering to the provided schema and available tools. The JSON schema represents a call to a tool, and its functions and arguments.

Here is the list of available tools and their functions:
1. name: weather; description: gets the weather given a city and state; function: getWeather, arguments: city (string), state (string)
2. name: webSearch; description: performs a web search and returns results to be used as context; function: search, arguments: query (string)
3. name: taskRunner; description: triggers a task to be run on the local computer. possible jobNames are: backupHome, syncGit, checkUpdates; function: invoke; arguments: jobName (string)

You will attempt to fulfill the role of a tool call generator if there is an existing tool which relates to this query. YOU SHALL NOT attempt a tool call if there is no related tool to call based on the query.

When performing this role, your response SHALL ONLY BE IN RAW JSON format. Do not include any other text not related to the raw JSON response. An example message which represents a call to a tool.

For example, if a user asks the following:
"What is the weather for Sunnyvale CA?"

Your output will be in raw JSON following a schema similar to this:
{
  "name": "weather",
  "function": "getWeather",
  "args": [
    {
      "city": {"type": "string", value: "Sunnyvale" },
      "state": { type: "string", value: "CA" }
  ]
}

**Role 2 - Response Formulator**

Your second job role is tasked with formulating a response based on the user's query and the result of the tool call. The goal is to formulate a natural language response which incorporates the information presented in the message.

For example, a message would be:
User query: What is the weather for Sunnyvale, CA?
Tool call result: 67 F

Your response will take the above information and formulate a response that creates a natural conversation. For example:
The weather in Sunnyvale, CA is currently 67 F.

**Role 3 - A Helpful Assistant**

For any other messages which do not fit the other 2 roles, you may serve as a helpful assistant. Only perform this role when the other two do not apply. Therefore, this is the lowest priority role to be performed.
The approach is to prompt the LLM to perform 3 different roles: one which decides that a query should lead to a tool call, one that processes the result of the tool call, and one that continues to be a helpful assistant.
I haven't written any software around this yet, so we can just pretend tool calling now by sending these messages and formatting them as appropriate.
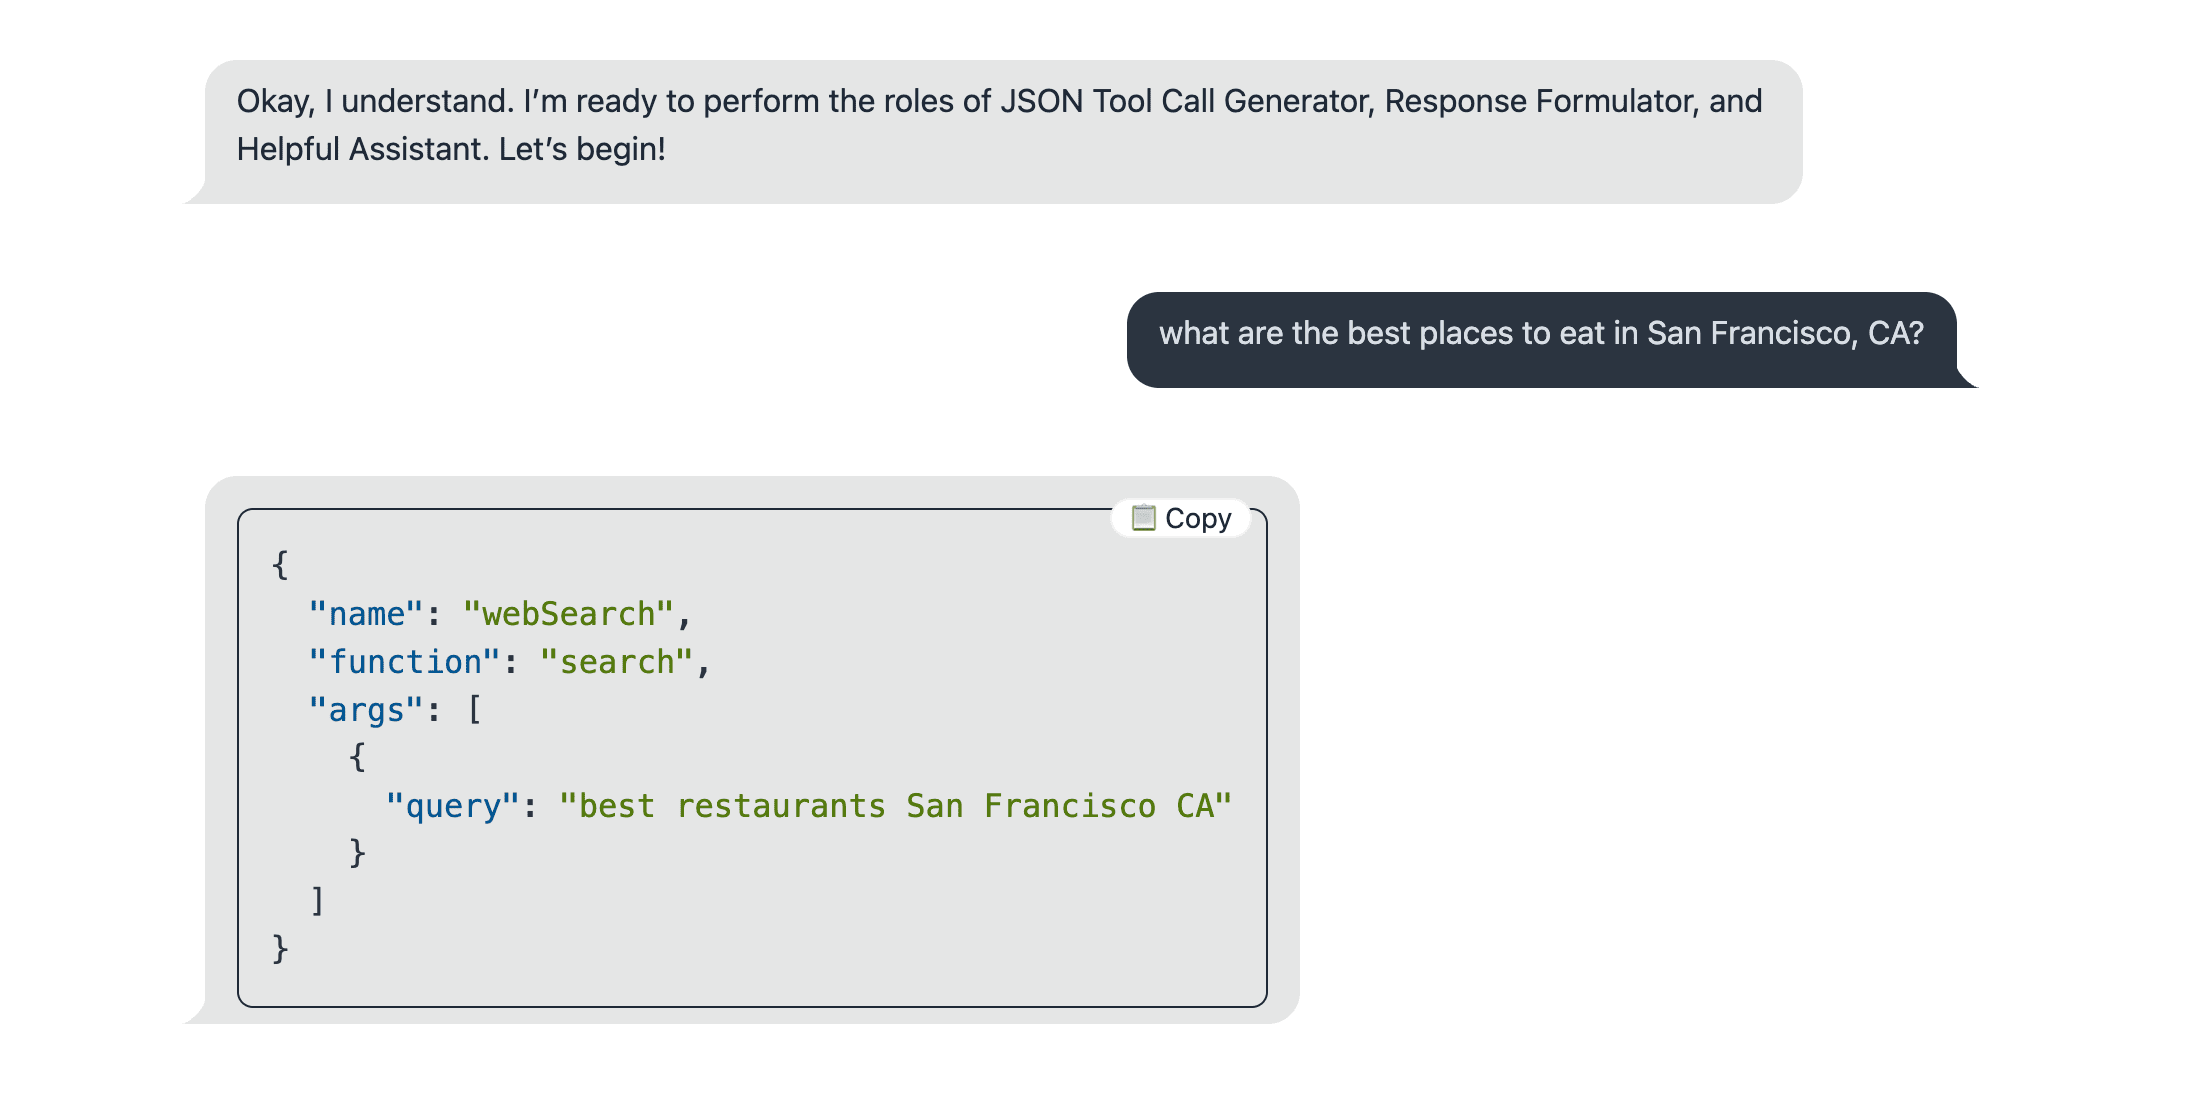
So now, suppose we had an app that understands the specific JSON schema:
{
  "name": "webSearch",
  "function": "search",
  "args": [
    {
      "query": "best restaurants San Francisco CA"
    }
  ]
}
Our app can now do the following:
- Parse the JSON and extract the search query
- Invoke a search engine API (Google, Duck Duck Go, Kagi, etc) with the query
- Receive JSON results from the search engine
- Use some sort of page scraper to scrape the first few results
- Concatenate the data into a response message back to the LLM
Now we can simulate this result by building the message to force the LLM to perform Role 2 - "The Response Formulator". We can such a message behind the scenes before the HTTP response back to the client:
User query: what are the best places to eat in San Francisco, CA?
Tool call result:
Restaurants


Looking to expand your search outside of San Francisco? We have suggestions.

Expand your search.

Unique and Whimsical artwork by famous NY Street artist @TomBobNYC can be found all around the container restaurant! Look for them!
Mersea Custom Succulent Wall with custom Mosaic frame created by Angelina Duckett. Succulent Design-Creation from Kevin (The Living Wall Guy).  Charming bicycle from Diana ( Succulents by Diana)

2024
1. Mersea Restaurant & Bar
4.9
(659 reviews)
Closed now
American, Bar
$$ - $$$
Menu
... the outside (they make it with Haddock!!) and moist and juicy on the insi...
Lovely waterfront restaurant/bar
Reserve


2024
2. Fog Harbor Fish House
4.4
(6,186 reviews)
Closed now
American, Seafood
$$ - $$$
Menu
We had dinner at Fog Harbor on our first night in San Francisco and it did not...
... and the Fresh Battered Cod and Fries.

...
[TRUNCATED FOR THIS BLOG POST]
...

2024
12. Eagle Cafe
4.0
(1,067 reviews)
Closed now
American, Bar
$$ - $$$
Menu
Over the 2 days I had a ham and cheese omelet and eggs benedict, both of whic...
The fish is crispy and delicious and the...
Our LLM playing the "Response Formulator" role responds with his message that we can then send back to the client. They will never know that we called a tool, and it makes our LLM look very smart!
Okay, here are some of the best restaurants in San Francisco, based on recent reviews! There's Mersea Restaurant & Bar, Fog Harbor Fish House, Original Joe's, Eight Am, Waterbar, Fogo de Chão Brazilian Steakhouse, Seven Hills, Kokkari Estiatorio, Quince, Frascati, Gary Danko, Harris’ Restaurant, State Bird Provisions, Nopa, Boulevard, Blue Mermaid Restaurant, Pier Market Seafood Restaurant, Crab House at Pier 39, Mo’s Grill, The Codmother Fish & Chips, and Eagle Cafe. They offer a wide variety of cuisines and price ranges, from American and seafood to Italian and Brazilian. Would you like me to narrow down the suggestions based on a specific type of food or price range?
Is Higher Quantization Always Better?
I think the answer here is that it depends. Higher quantization provided if you have the hardware is always preferable. However, this varies by use-case. Lower quantization, if you can tolerate a loss in precision, can result in lower latency for your specific application. This is especially important if you are computing at the edge.
If you don't need high accuracy for your task and need the speed, I think a Q4_K_M model is actually pretty good for RAG and summarization scenarios. It really depends on what you plan to use a local language model for. That is a point. Being local is what makes it flexible. You can pick and choose to load the model that best fits your needs any time as long as you have the enough storage and compute for it.
This table is like a cheat sheet, not exact numbers with what you should expect for memory and latency if your model is quantized at these different "usable" levels.
| Quantization Level | RAM | Latency |
| None | ~ 2 * total_params bytes | Slowest |
| Q8_0 | ~ total_params bytes | Slow |
| Q6_K | ~ 0.75 * total_params bytes | Fast |
| Q5_K | ~ 0.62 * total_params bytes | Faster |
| Q4_K_M | ~ 0.5 * total_params bytes | Fastest |
Takeaway here is that you can just always test the model to your use case at the various quantization levels. 🙂
Conclusion
I think it's pretty cool with what we can do with small language models on the CPU!
The goal I wanted with this post is to help someone understand that we don't need to have GPUs to run AI locally like LLMs.
We can do a lot locally, but the approach to thinking about productivity with local small language models is that that smaller language models aren't intended shouldn't be expected to replace the large language models used in the cloud.
Cloud-based large language models are still amazing and useful. We might still need them for some use cases which require a bit more intelligence. Let's admit, the cloud-based models are awesome and state of the art. They are also extremely performant. Speed don't lie. 😄
However, there are tasks in which we may want to perform directly on our system such as executing a tool to maintain the filesystem, or access personal files (organize emails). These are perfect scenarios for local small language models since there is a benefit to privacy, and security of our data within our own personal premises.
In summary, we can use local small language models for:
- Vision tasks such as document parsing, and curation
- Tool calling for agentic AI scenarios
- RAG - Retrieval Augmented Generated search
- Personal search indexing and organization
- Document summarization (research papers, legal, etc.)
- Classification tasks
Future posts will aim to help walk you through with just that!
References
Here are some useful links in no specific order:
- ggml-org/llama.cpp: LLM inference in C/C++
- Concepts - Small and large language models - Azure Kubernetes Service | Microsoft Learn
- Windows 11 Specifications for a Copilot+ PC
- Gemma 3 - Tool calling - Function calling with Gemma | Google AI for Developers
Bonus - llama.cpp with CUDA
Get llama.cpp working with CUDA. It's pretty easy, and just tacking on -DGGML_CUDA=ON once you have the NVIDIA CUDA toolkit installed (there are plenty of resources online here)
# Create the build configuration
cmake -B build -DBUILD_SHARED_LIBS=OFF -DCMAKE_INSTALL_PREFIX=$HOME/bin/llama.cpp -DGGML_CUDA=ON -DLLAMA_BUILD_TESTS=OFF -DLLAMA_BUILD_EXAMPLES=ON -DLLAMA_BUILD_SERVER=ON

# Build llama.cpp with the Release profile using the number of hardware threads available from your CPU
cmake --build build --config Release -j $(nproc)

# Install
cmake --install build --config Release
Bonus - llama.cpp with Vulkan
Here's how to build llama.cpp with compatibility for any Vulkan capable GPU!
Install the Vulkan SDK on Ubuntu
Install the Vulkan SDK on Ubuntu here: vulkan.lunarg.com/doc/view/latest/linux/getting_started_ubuntu.html
You can also just run the following commands:
wget -qO- https://packages.lunarg.com/lunarg-signing-key-pub.asc | sudo tee /etc/apt/trusted.gpg.d/lunarg.asc
sudo wget -qO /etc/apt/sources.list.d/lunarg-vulkan-noble.list http://packages.lunarg.com/vulkan/lunarg-vulkan-noble.list
sudo apt update
sudo apt install vulkan-sdk
To verify a successful installation, you can run vulkaninfo or vkvia. Typical output of vkvia looks like this. I ran it through SSH so it couldn't find a display:
$ vkvia
VIA_INFO:    SDK Found! - Will attempt to run tests
VIA_INFO:       Attempting to run vkcube in
VIA_INFO:           Command-line: vkcube --c 100 --suppress_popups
/usr/bin/vkcube
Selected WSI platform: xlib
Environment variable DISPLAY requires a valid value.
Exiting ...
VIA_INFO:           Command-line: vkcube --c 100 --suppress_popups --validate
/usr/bin/vkcube
Selected WSI platform: xlib
Environment variable DISPLAY requires a valid value.
Exiting ...
VIA_ERROR:   Unknown Test failure occurred.
You'll just want to look fo rthe "SDK Found!" message.
Next, you need to configure llama.cpp to build with Vulkan.
# Create the build configuration
cmake -B build -DBUILD_SHARED_LIBS=OFF -DCMAKE_INSTALL_PREFIX=$HOME/bin/llama.cpp -DGGML_VULKAN=ON -DLLAMA_BUILD_TESTS=OFF -DLLAMA_BUILD_EXAMPLES=ON -DLLAMA_BUILD_SERVER=ON

# Build llama.cpp with the Release profile using the number of hardware threads available from your CPU
cmake --build build --config Release -j $(nproc)
Notice the new flag -DGGML_VULKAN=ON - This tells the build definitions to now build with Vulkan.
After building, install as normal:
cmake --install build --config ReleaseDone!